Road Lane Detection with Raspberry Pi
Simple road lane detection on Raspberry Pi 3 using OpenCV and Python. Frame rates obtained up to 17 FPS.
Self-driving cars are one of the new trends in the modern world. They use very sophisticated control systems and engineering techniques to maneuver the vehicle. Road lane detection is one of the important things in the vehicle navigation. Here I'm describing a simple and fast lane detection using Raspberry pi 3 and computer vision techniques. For fast calculation I just avoided linear regression method. This method gives the good result for low noise environment but for complex scenes advanced statistical and image processing techniques are needed.
Hardware setupConnect the camera with your Pi
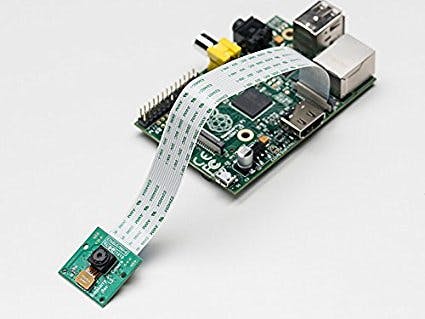
Follow this link for camera setup https://www.raspberrypi.org/documentation/configuration/camera.md
Software setupInstall OpenCV for python. Follow these instructions to install OpenCV. These instructions were copied from https://raspberrypi.stackexchange.com.
Generic stuffsudo apt-get update
sudo apt-get upgrade
sudo rpi-update
sudo reboot
sudo apt-get install build-essential git cmake pkg-config
sudo apt-get install libjpeg-dev libtiff5-dev libjasper-dev libpng12-dev
sudo apt-get install libavcodec-dev libavformat-dev libswscale-dev libv4l-dev
sudo apt-get install libxvidcore-dev libx264-dev
sudo apt-get install libgtk2.0-dev
sudo apt-get install libatlas-base-dev gfortran
cd ~
git clone
cd opencv
git checkout 3.1.0
cd ~
git clone
cd opencv_contrib
git checkout 3.1.0
If you want to use OpenCV with python 2.7 :
sudo apt-get install python2.7-dev
wget
sudo python
pip install numpy
cd ~/opencv
mkdir build
cd build
cmake -D CMAKE_BUILD_TYPE=RELEASE \
    -D INSTALL_C_EXAMPLES=OFF \
    -D INSTALL_PYTHON_EXAMPLES=ON \
    -D OPENCV_EXTRA_MODULES_PATH=~/opencv_contrib/modules \
    -D BUILD_EXAMPLES=ON ..
make -j4
sudo make install
sudo ldconfig
sudo apt-get install python3-dev
wget
sudo python3
pip install numpy
cd ~/opencv
mkdir build
cd build
cmake -D CMAKE_BUILD_TYPE=RELEASE \
    -D CMAKE_INSTALL_PREFIX=/usr/local \
    -D INSTALL_C_EXAMPLES=OFF \
    -D INSTALL_PYTHON_EXAMPLES=ON \
    -D OPENCV_EXTRA_MODULES_PATH=~/opencv_contrib/modules \
    -D BUILD_EXAMPLES=ON ..
make -j4
sudo make install
sudo ldconfig
It takes around 2 hours so wait it.During this time we can learn about Hough-Transform. This technique is the key thing behind most of the practical lane detection algorithm.
What is Hough Transform?Watch this video for better understanding. Thanks to Thales Sehn Körting -the creator of this video.
For opencv-python documentation http://opencv-python-tutroals.readthedocs.io/en/latest/py_tutorials/py_imgproc/py_houghlines/py_houghlines.html
python code
from picamera.array import PiRGBArray
import RPi.GPIO as GPIO
from picamera import PiCamera
import time
import cv2
import numpy as np
import math
GPIO.setmode(GPIO.BOARD)
GPIO.setup(7, GPIO.OUT)
GPIO.setup(8, GPIO.OUT)
theta=0
minLineLength = 5
maxLineGap = 10
camera = PiCamera()
camera.resolution = (640, 480)
camera.framerate = 30
rawCapture = PiRGBArray(camera, size=(640, 480))
time.sleep(0.1)
for frame in camera.capture_continuous(rawCapture, format="bgr", use_video_port=True):
   image = frame.array
   gray = cv2.cvtColor(image, cv2.COLOR_BGR2GRAY)
   blurred = cv2.GaussianBlur(gray, (5, 5), 0)
   edged = cv2.Canny(blurred, 85, 85)
   lines = cv2.HoughLinesP(edged,1,np.pi/180,10,minLineLength,maxLineGap)
   if(lines !=None):
       for x in range(0, len(lines)):
           for x1,y1,x2,y2 in lines[x]:
               cv2.line(image,(x1,y1),(x2,y2),(0,255,0),2)
               theta=theta+math.atan2((y2-y1),(x2-x1))
   #print(theta)GPIO pins were connected to arduino for servo steering control
   threshold=6
   if(theta>threshold):
       GPIO.output(7,True)
       GPIO.output(8,False)
       print("left")
   if(theta<-threshold):
       GPIO.output(8,True)
       GPIO.output(7,False)
       print("right")
   if(abs(theta)<threshold):
      GPIO.output(8,False)
      GPIO.output(7,False)
      print "straight"
   theta=0
   cv2.imshow("Frame",image)
   key = cv2.waitKey(1) & 0xFF
   rawCapture.truncate(0)
   if key == ord("q"):
       break
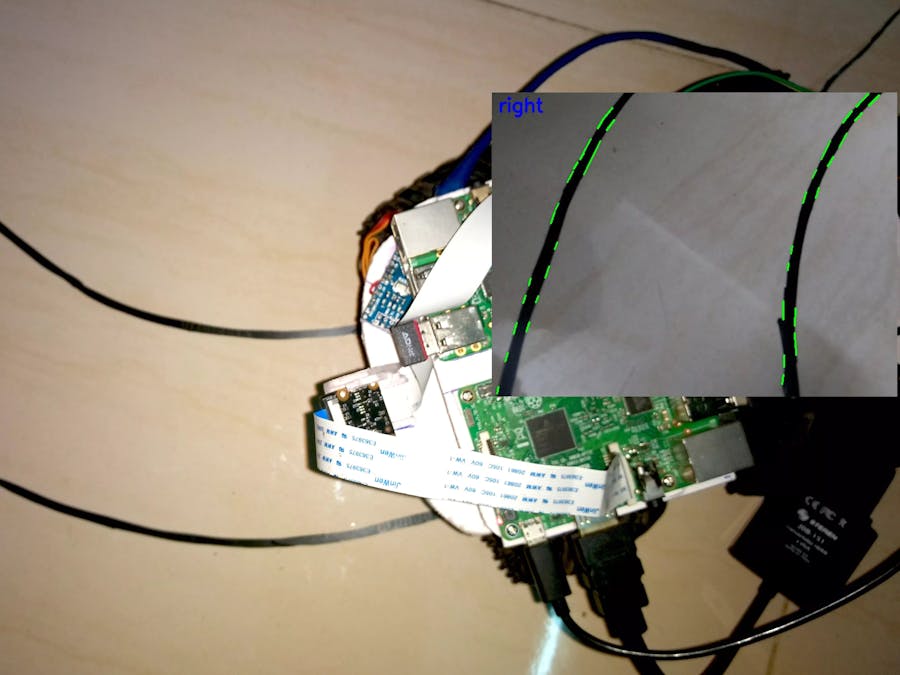
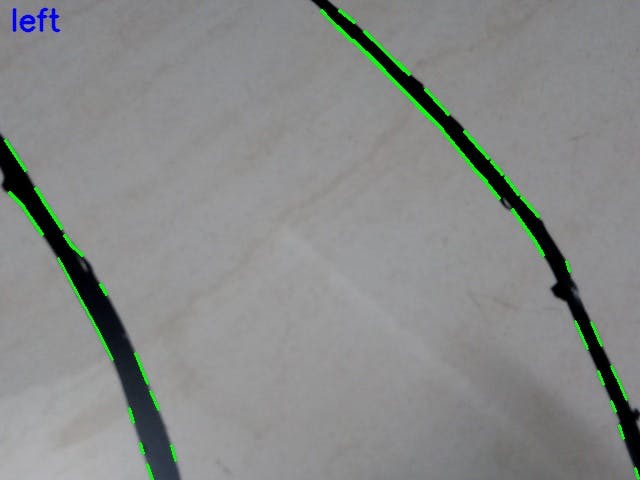
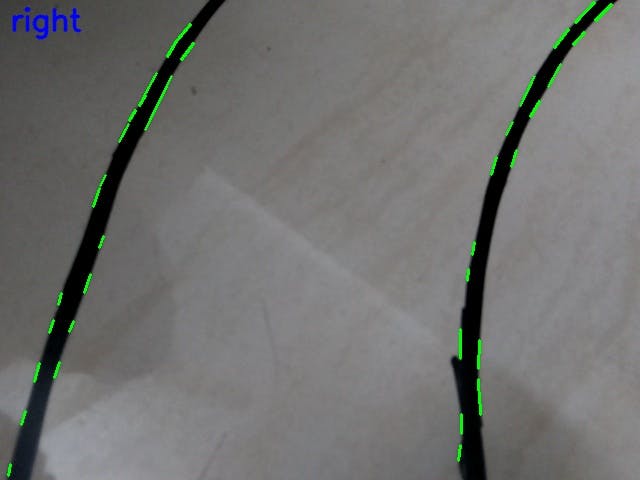
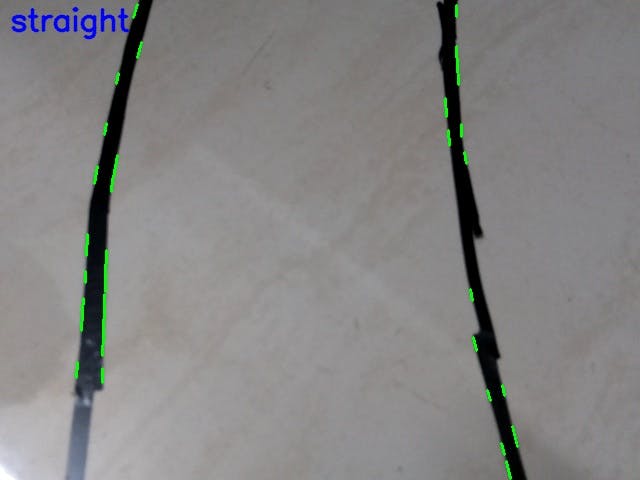
Some sample output results:
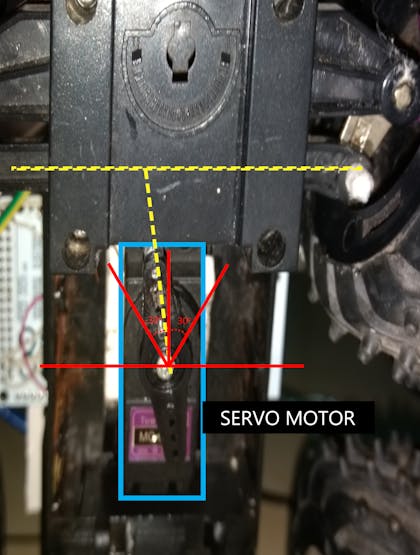
The GPIO pins are connected to Arduino mega for servo motor control.
#include <Servo.h>
Servo myservo;
void setup() {
  myservo.attach(10);//attach servo motor PWM(orange) wire to pin 10
  pinMode(0, INPUT);//attach GPIO 7&8 pins to arduino pin 0&1
  pinMode(1,INPUT);
void loop() {
           if(digitalRead(0)==HIGH && digitalRead(1)==LOW)
                {
                      myservo.write(118);
                }
          if(digitalRead(1)==HIGH && digitalRead(0)==LOW)
                {
                      myservo.write(62);
                }
          if(digitalRead(1)==LOW && digitalRead(0)==LOW)
                {
                       myservo.write(90);
                }
}
I am not a good coder please give suggestions and feedback in the comment section.