In the past couple years, the ESP8266 platform has flourished dramatically and emerged as one of the most popular hardware tools among electronics hobbyists and IoT enthusiasts. Packed with a 32-bit RISC CPU running at 80 MHz, a fully integrated WiFi radio with TCP/IP protocol stack, serial peripherals (I2C, SPI, and UART), an ADC channel, and general purpose I/O pins, the ESP8266 is the most integrated and affordable WiFi solution available in the current IoT market space. An ESP8266 hardware, like NodeMCU and ESP-01, can directly interface with sensors using its peripherals and upload the sensor measurements to a local or a remote web server via internet. Right now, there are already quite a bit of cloud IoT platforms (ThingSpeak, thinger.io, TESPA.io, Xively, … the list is getting bigger everyday) that provides APIs and tools to allow the ESP8266 users to directly upload their sensor readings online for real-time visualization and global access. If you are a regular user of Google Drive, like me, you would find a Google sheet more approachable than all those IoT cloud platforms. In this tutorial, I will describe a method of connecting the ESP8266 device directly to a Google sheet for storing the sensor data without using any third party plugin. For illustration, I am using a NodeMCU board that reads the analog output from a soil moisture sensor inserted into one my flower pots and directly connects to a spreadsheet on my Google Drive for storing the data.
ESP8266 data logging to Google spreadsheets
Basically there are two parts to this project. The first part is setting up the ESP8266 hardware to read the soil moisture sensor output. The second part involves creating a Google sheet and configuring it to accept the sensor data sent by the ESP8266 module over the internet using a Google App Script that is provided with this tutorial.
Hardware setup
This project uses a very simple and inexpensive soil moisture sensor (one you can buy on eBay or Aliexpress for $1) kit consisting of two exposed metal pads and an instrumentation circuit board. The exposed pads act as probes for sensing the moisture level within the soil. The more water in the soil means higher conductivity between the two pads, and vice-versa. The accompanying instrumentation board provides an analog output voltage that varies with the moisture level of the soil. The instrumentation circuit is powered with a 3.3V supply and its output is fed to the analog input channel (A0) of the NodeMCU.
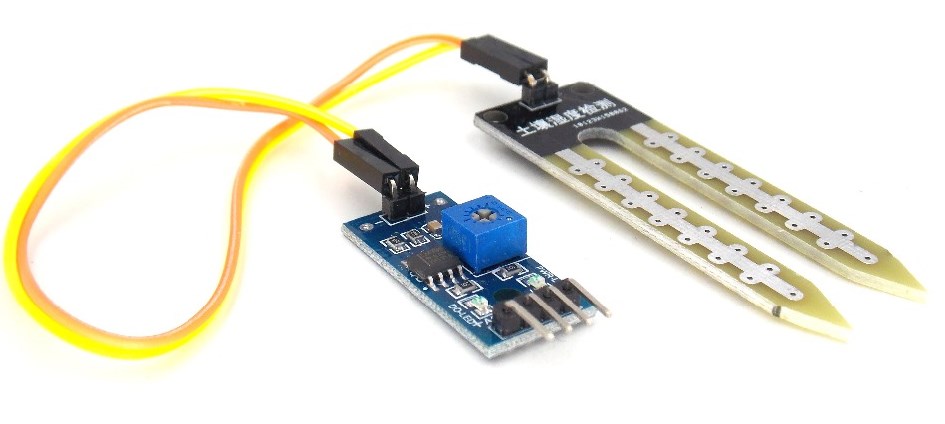
Soil moisture sensor consisting of exposed metal pads and an instrumentation circuit
Note: The ESP8266 analog input can handle the maximum input voltage of 1V. However, the NodeMCU implements a voltage divider circuit on board to expand the range of input voltage to 3.3V.
Software
Let’s first try to understand what really happens when we try to send data to Google’s end. We will obviously be sending data using a GET request over an URL which has a pattern of https://script.google.com/….. When you enter this URL in a web browser, the Google’s server responds back asking the browser to redirect to another URL with domain script.googleusercontent.com with a new GET request. For a web browser, the URL redirection is a very common thing and it works without any problem. However, for ESP8266, this is not straight forward. The ESP8266 needs to correctly decode the header information received from the first server to extract the redirect URL and make a second GET request to the new server. To make this redirection simpler, Sujay Phadke, aka electronicsguy, has shared on GitHub a beautiful piece of code in the form of Arduino Library named HTTPSRedirect. There are other examples of Arduino posting data to Google spreadsheets using a third party API service, like pushingbox, for handling Google’s https requirement and URL redirection. The use of HTTPSRedirect library makes the task much simpler by avoiding the need of any third party service. So, the first thing you need to do is to copy the HTTPSRedirect library files from GitHub and install into your Arduino libraries folder. I have also posted the zipped library files at the following link for convenience.
Update: The above library is outdated.
Please go to GitHub Sujay Phadke and download the updated library. Thanks Sujay.
In order to install it on your machine, simply download the above zipped file, unzip it, and move the folder named HTTPSRedirect into your Arduino’s libraries location. On Windows PC, it typically goes to C:\Users\\Documents\Arduino\libraries\ .
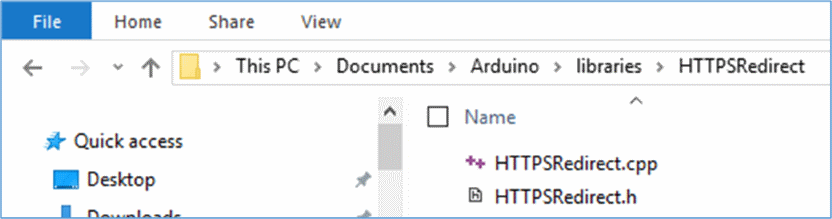
Arduino IDE Library Path on a Windows PC
Make sure both HTTPSRedirect.cpp and HTTPSRedirect.h files exist inside the copied library folder as shown above.
Program ESP8266 to send data to Google Sheets
Posted below is the ESP8266 code written using Arduino IDE for reading the soil moisture sensor output and posting it to a Google Sheet on your Google Drive. In order to make it work for your case, you will need to update the ssid and password matching to your WiFi network. Also, you will also need to get the *GScriptId, which can only be obtained after publishing the required Google App Scripts. The process of obtaining the *GScriptId is explained towards the bottom of this tutorial. The sensor data are posted to the Google sheet every 15 minutes.
// BY: Akshaya Niraula
// ON: Nov 11, 2016
// AT: http://www.embedded-lab.com/
#include <ESP8266WiFi.h>
#include “HTTPSRedirect.h”
const char* ssid = “–Your-SSID–“;
const char* password = “–Your-Password–“;
// The ID below comes from Google Sheets.
// Towards the bottom of this page, it will explain how this can be obtained
const char *GScriptId = “—Your-Google-Script-ID–=”;
// Push data on this interval
const int dataPostDelay = 900000; // 15 minutes = 15 * 60 * 1000
const char* host = “script.google.com”;
const char* googleRedirHost = “script.googleusercontent.com”;
const int httpsPort = 443;
HTTPSRedirect client(httpsPort);
// Prepare the url (without the varying data)
String url = String(“/macros/s/”) + GScriptId + “/exec?”;
const char* fingerprint = “F0 5C 74 77 3F 6B 25 D7 3B 66 4D 43 2F 7E BC 5B E9 28 86 AD”;
// We will take analog input from A0 pin
const int AnalogIn = A0;
void setup() {
Serial.begin(115200);
Serial.println(“Connecting to wifi: “);
Serial.println(ssid);
Serial.flush();
WiFi.begin(ssid, password);
while (WiFi.status() != WL_CONNECTED) {
delay(500);
Serial.print(“.”);
}
Serial.println(” IP address: “);
Serial.println(WiFi.localIP());
Serial.print(String(“Connecting to “));
Serial.println(host);
bool flag = false;
for (int i=0; i<5; i++){
int retval = client.connect(host, httpsPort);
if (retval == 1) {
flag = true;
break;
}
else
Serial.println(“Connection failed. Retrying…”);
}
// Connection Status, 1 = Connected, 0 is not.
Serial.println(“Connection Status: “ + String(client.connected()));
Serial.flush();
if (!flag){
Serial.print(“Could not connect to server: “);
Serial.println(host);
Serial.println(“Exiting…”);
Serial.flush();
return;
}
// Data will still be pushed even certification don’t match.
if (client.verify(fingerprint, host)) {
Serial.println(“Certificate match.”);
} else {
Serial.println(“Certificate mis-match”);
}
}
// This is the main method where data gets pushed to the Google sheet
void postData(String tag, float value){
if (!client.connected()){
Serial.println(“Connecting to client again…”);
client.connect(host, httpsPort);
}
String urlFinal = url + “tag=” + tag + “&value=” + String(value);
client.printRedir(urlFinal, host, googleRedirHost);
}
// Continue pushing data at a given interval
void loop() {
// Read analog value, in this case a soil moisture
int data = 1023 – analogRead(AnalogIn);
// Post these information
postData(“SoilMoisture”, data);
delay (dataPostDelay);
}
You can also download the NodeMCU code from the following link.
Download NodeMCU code
Create Google Sheets
Create a Google spreadsheet in your Google Drive and name it something like DataCollector. Rename the current/active sheet to Summary and add a second sheet, call it DataLogger. From the URL address bar of the sheet, copy the string between d/ and /edit and save it somewhere. This is your spreadsheet’s unique sharing key, which will be needed in the Google Apps scripts later.
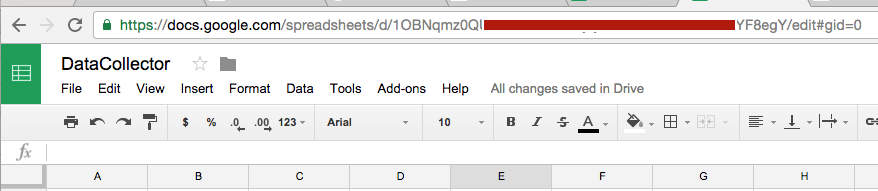
Unique sharing key for your Google spreadsheet can be found in the URL
Note: The name of the Google spreadsheet does not matter much because we will be using the sharing key of the sheet, which is unique, in the Google Apps Scripts to access it. However, the sheets name (Summary andDataLogger) have to match with what you put in your Google Apps Scripts (described later).
In the Summary sheet, type Last Modified On on cell A1, DataLogger Count on A2, and Next Read Time on A3. In cell B2, type a formula that will give us the data count ‘=counta(DataLogger!D:D) -1‘ In B3, type this equation, =B1 + TimeValue(“00:15”), which will simply add 15 minute to last modified date time. To support a gauge chart in Google Sheets, some information from A6 to B7 has been added, as showing in the image below
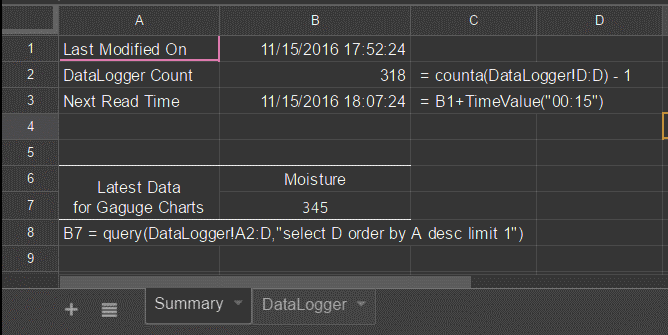
Goolge Sheets – Summary tag
In the DataLogger sheet, type ID, DateTime, Tag, and Value in A1, B1, C1 and D1, respectively.
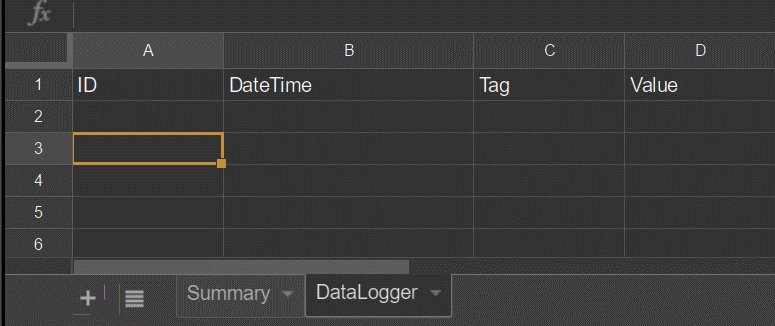
Google Sheets Data Logger Tab
Google Apps Scripts
To create a Google App Scripts, go to Tools > Script Editor from the Google Sheets. In the code section, paste the code below. The code or script can be saved under any name.
Important Note: In the above script, the sheet names should match to those we want to be populated.
Similarly, you would also need to edit the spreadsheet sharing key in the script to match with yours (one you copied from the spreadsheet URL earlier).
Download Goolge App Scripts
Deploy the contents as Web app
Next step is to publish the script so that it is accessible through an URL. In order to do that, Publish > Deploy as Web App.
Note: Whenever you modify your code, you have to create a “New” Project version and publish it otherwise you will still be hitting the same old code.
Copy the Current web app URL and save it somewhere as we will need it for extracting the GScriptID. I usually save it in my code as a comment. The web app URL would look like this:
https://script.google.com/macros/s/–Your Google Script ID–/exec?tag=test&value=-1
The string between s/ and /exec? is your GScriptID.
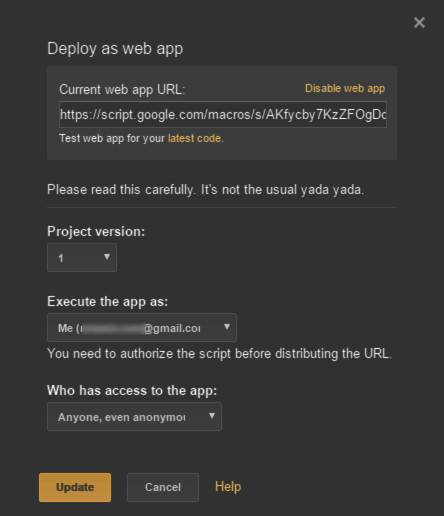
Deploy As Web App
During publishing, Google will ask to grant some of the permissions and you need to allow those.
Test the Progress
If things been followed properly, the following test should go successful. Copy the web app URL that you received during publishing, format it like shown above and paste this string in your web browser URL field. You should see the following information populated in the DataLogger sheet as shown below.

Test data posted to Google sheet
So far so good? If not, double check the steps. If the URL entered in your browser populated the values in your sheet then update your GScriptID in the ESP8266 code posted earlier.
Output
I added a line chart to visualize the time series of sensor data posted on the DataLogger sheet. The source range for the chart is big enough to cover any new data sent by ESP8266. You can also add a gauge to display the most recent soil moisture data.
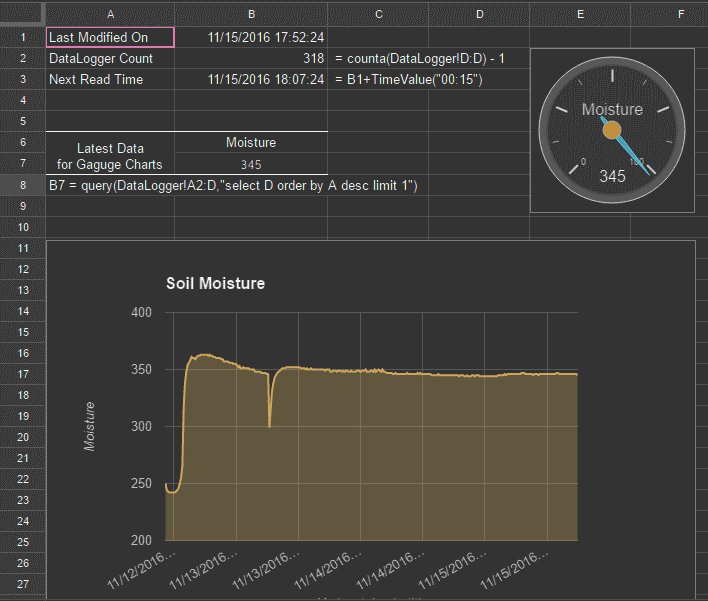
Charts based on data posted on DataLogger sheet by NodeMCU
Here’s a quick view of the DataLogger sheet. The moisture data are recorded with time stamps.
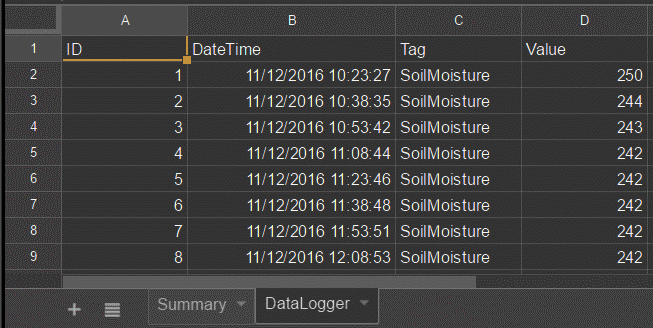
Sensor data posted by ESP8266 with a minute interval