• Home
  • Prakash
    • R and D
    • Smart Home
  • Basics
    • Capacitors
      • Color codeing Disc Capacitor Capacitor characterstics Polarity Non Polarity Series Connection Parallel Connection
    • Diodes
      • Zener Diode Light Emitting Diode Signal Diode Photo Diode
    • Inductors
    • Transistor
      • Silicon Germenium NPN PNP MOSFET SCR
    • Resistors
      • Color codeing 4-Band 5-Band Series Parallel Potential Meter
    • Logics
      • Analog Logic
      • Digital Logic
      • Hexa Decimal Numbers
      • Octal Numbers
      • Binary Fraction
      • Binay to Decimal
    • OP-Amplifiers
      • Basics
      • Oscillators
      • Transistor Switch
      • 555 IC circuits
      • Waveform Generators
      • 741 IC Circuits
    • Power supply
      • Transformer
      • Halfwave Rectifier
      • Fullwave Rectifier
      • Bridge Rectifier
      • 78xx Series
      • 0 to 30v Regulator
  • Modules
    • H-Bridge
      • L293D Bridge
      • Relay Bridge
    • RF 434MHz Modules
    • Relay Modules
    • Push to ON switch
    • Push to OFF switch
  • Sensors
    • Analog sensors List-1
      • LDR Photo Diode Solar Cell Transducers Temperature Humidity Sensor Soil Moisture Ranger Sensor Range Detection
    • Analog sensors List-2
      • Flame Sensor Force Sensor Flex Sensor Ambient Sensor Motion Sensor Vibration Sensor Sound Sensor UltraSonic Sensor GrayScale Sensor
    • Digital Sensors
      • Touch Sensor Tilt Sensor Signal
    • 3-Axis Sensor
    • Gyro Sensor
  • Projects
    • Embedded
      • Mini Projects 8051 Arduino NodeMCU MSP430 Raspberry IOT ARM
    • C #
      • Visual Basic Visual Studio
    • Matlab
    • VLSI
    • PHP-HTML
    • Contribute
  • Downloads
  • Technology

NodeMCU Access Point web Server


ESP8266 example: Wi-Fi Access point, static IP, web-server and remote GPIO control


After testing the basic Wi-Fi connectivity options of the ESP8266 it is now time to explore some of the more interesting features of the chip. In the sketch below the NodeMCU development board creates a Wi-Fi access point and starts a web-server. A HTML page hosted on the web-server displays analog data from a photocell and allows you to control remotely a LED via Wi-Fi from a web-browser on your phone or PC. As in the previous examples, I am using the Arduino IDE to program the ESP8266 board.
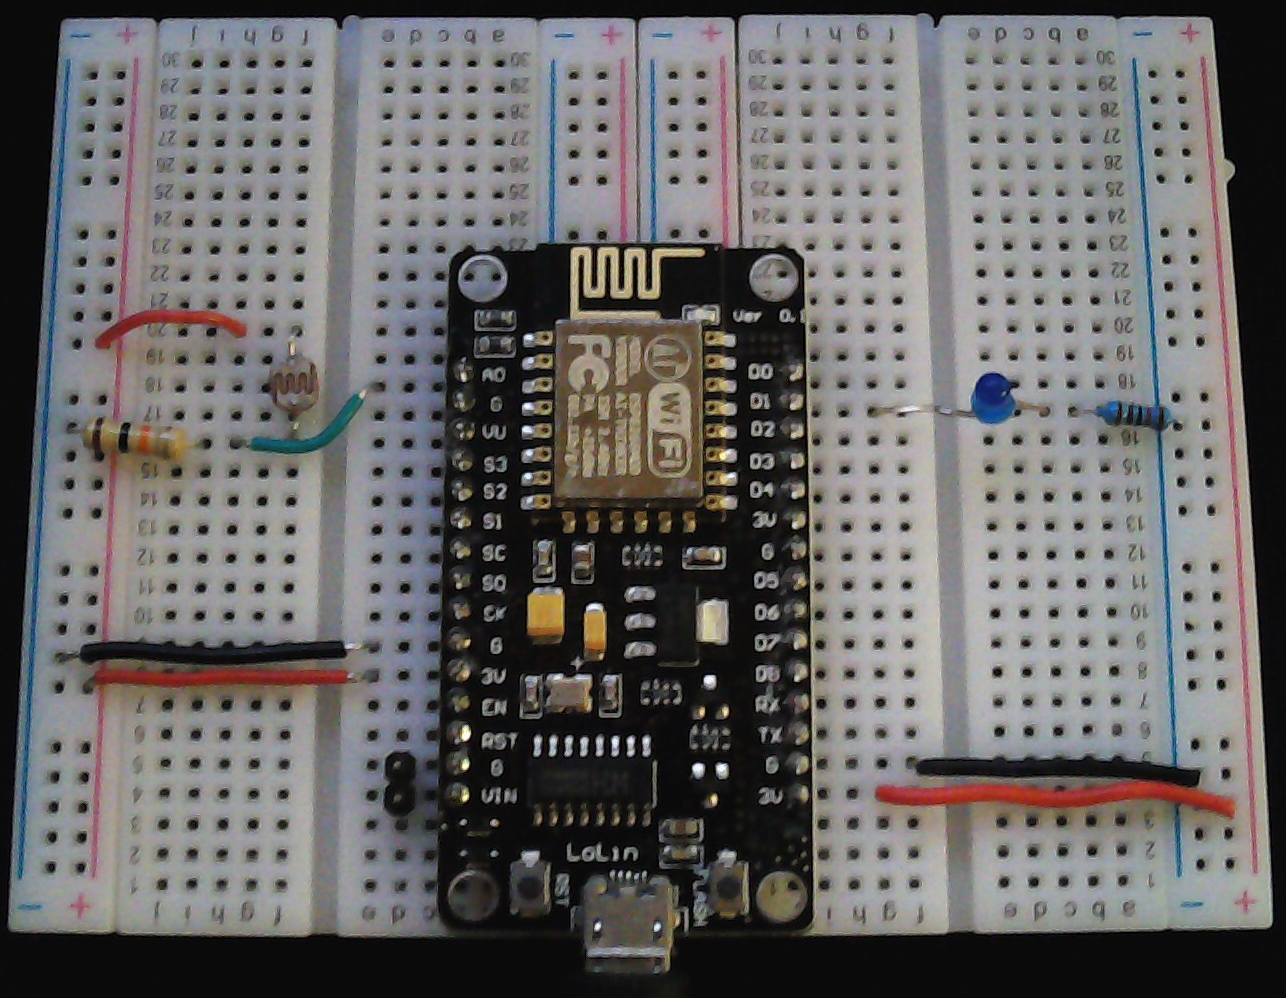
The LED is connected to NodeMCU pin D1 (ESP8266 GPIO5) through a 1k resistor. One leg of the photocell is connected  to 3.3v and the other one to ground trough a fixed 10k Ohm (or higher) resistor. There is also a connection from the NodeMCU pin A0 (ESP8266 ADC0) to the point between the fixed pull-down resistor and the variable photocell resistor.
ESP8266 Web Server
ESP8266 Web Server example connections with the larger variant of the NodeMCU board
And here is the sketch:

#include <ESP8266WiFi.h>
#include <ESP8266WebServer.h>
IPAddress apIP(192,168,45,1); // Defining a static IP address: local & gateway
// Default IP in AP mode is 192.168.4.1
/* This are the WiFi access point settings. Update them to your likin */
const char *ssid = "ESP8266";
const char *password = "ESP8266Test";
// Define a web server at port 80 for HTTP
ESP8266WebServer server(80);
const int ledPin = D1; // an LED is connected to NodeMCU pin D1 (ESP8266 GPIO5) via a 1K Ohm resistor
bool ledState = false;
void handleRoot() {
digitalWrite (LED_BUILTIN, 0); //turn the built in LED on pin DO of NodeMCU on
digitalWrite (ledPin, server.arg("led").toInt());
ledState = digitalRead(ledPin);
/* Dynamically generate the LED toggle link, based on its current state (on or off)*/
char ledText[80];
if (ledState) {
strcpy(ledText, "LED is on. <a href=\"/?led=0\">Turn it OFF!</a>");
}
else {
strcpy(ledText, "LED is OFF. <a href=\"/?led=1\">Turn it ON!</a>");
}
ledState = digitalRead(ledPin);
char html[1000];
int sec = millis() / 1000;
int min = sec / 60;
int hr = min / 60;
int brightness = analogRead(A0);
brightness = (int)(brightness + 5) / 10; //converting the 0-1024 value to a (approximately) percentage value
// Build an HTML page to display on the web-server root address
snprintf ( html, 1000,
"<html>\
<head>\
<meta http-equiv='refresh' content='10'/>\
<title>ESP8266 WiFi Network</title>\
<style>\
body { background-color: #cccccc; font-family: Arial, Helvetica, Sans-Serif; font-size: 1.5em; Color: #000000; }\
h1 { Color: #AA0000; }\
</style>\
</head>\
<body>\
<h1>ESP8266 Wi-Fi Access Point and Web Server Demo</h1>\
<p>Uptime: %02d:%02d:%02d</p>\
<p>Brightness: %d%</p>\
<p>%s<p>\
<p>This page refreshes every 10 seconds. Click <a href=\"javascript:window.location.reload();\">here</a> to refresh the page now.</p>\
</body>\
</html>",
hr, min % 60, sec % 60,
brightness,
ledText
);
server.send ( 200, "text/html", html );
digitalWrite ( LED_BUILTIN, 1 );
}
void handleNotFound() {
digitalWrite ( LED_BUILTIN, 0 );
String message = "File Not Found\n\n";
message += "URI: ";
message += server.uri();
message += "\nMethod: ";
message += ( server.method() == HTTP_GET ) ? "GET" : "POST";
message += "\nArguments: ";
message += server.args();
message += "\n";
for ( uint8_t i = 0; i < server.args(); i++ ) {
message += " " + server.argName ( i ) + ": " + server.arg ( i ) + "\n";
}
server.send ( 404, "text/plain", message );
digitalWrite ( LED_BUILTIN, 1 ); //turn the built in LED on pin DO of NodeMCU off
}
void setup() {
pinMode ( ledPin, OUTPUT );
digitalWrite ( ledPin, 0 );
delay(1000);
Serial.begin(115200);
Serial.println();
Serial.println("Configuring access point...");
//set-up the custom IP address
WiFi.mode(WIFI_AP_STA);
WiFi.softAPConfig(apIP, apIP, IPAddress(255, 255, 255, 0)); // subnet FF FF FF 00
/* You can remove the password parameter if you want the AP to be open. */
WiFi.softAP(ssid, password);
IPAddress myIP = WiFi.softAPIP();
Serial.print("AP IP address: ");
Serial.println(myIP);
server.on ( "/", handleRoot );
server.on ( "/led=1", handleRoot);
server.on ( "/led=0", handleRoot);
server.on ( "/inline", []() {
server.send ( 200, "text/plain", "this works as well" );
} );
server.onNotFound ( handleNotFound );
server.begin();
Serial.println("HTTP server started");
}
void loop() {
server.handleClient();
}
Load the sketch, open the serial monitor and restart your NodeMCU module. You should see the following output:
Configuring access point...
AP IP address: 42.42.42.42
HTTP server started
Now open the Wi-Fi settings of your phone, or PC. You should see a new Wi-Fi network, called “ESP8266” (assuming you left the defaults in the sketch above). Connect to it using the password from the sketch, open a new browser window and type http://42.42.42.42 in the address bar. This is the static IP we defined earlier in the sketch for the root of the web-server. You should see a page like the one below:
  • Share This:  
  •  Facebook
  •  Twitter
  •  Google+

Related Posts:

  • LM 35 TEMPERATURE SENSOR INTRODUCTION This is an Arduino Temperature Sensor based on LM35 temperature chip. A Temperature Sensor can be used to detect ambient air temperatu… Read More
  • ULTRA SONIC SENSOR MODULE INTRODUCTION URM37 V4.0 Arduino Ultrasonic Sensor comes with temperature compensation which provides better distance measurement accuracy. It is ve… Read More
  • RELAY SENSOR MODULE INTRODUCTION The DFRobot Relay Module is a standard relay used with a controller board to interface external electrical circuits or modules. Some o… Read More
  • Grayscale Sensor This gray scale sensor is able to measure the intensity of light from black to white.  A gray scale is also known as black-and-white, are compo… Read More
  • ANALOG SOUND SENSOR INTRODUCTION This is a new Arduino compatible Analog Sound Sensor.  Sound Sensor is typically used in detecting the loudness in ambient, the … Read More
Terms and Conditions -
Privacy Policy -

Contact Us

Name

Email *

Message *